![]() JC Thermal Master is an Android app that, when paired with a FLIR One Pro or FLIR Edge Pro thermal camera, transforms your mobile device into a portable thermal imaging inspection tool. View live thermal images, capture thermal with MIN/MAX/AVG and spot temperature readings (with optional visual images), and organize everything neatly into projects, right on-site, even offline.
JC Thermal Master is an Android app that, when paired with a FLIR One Pro or FLIR Edge Pro thermal camera, transforms your mobile device into a portable thermal imaging inspection tool. View live thermal images, capture thermal with MIN/MAX/AVG and spot temperature readings (with optional visual images), and organize everything neatly into projects, right on-site, even offline.
Works with FLIR One Pro (Android) and FLIR Edge Pro cameras on Android 13 or later.
JC Thermal Master is a powerful, project-based Android application designed for professional thermal imaging and analysis.
It supports structured inspection workflows and includes detailed metadata handling, calibration settings, and radiometry configuration.
It works fully offline, ideal for field inspections where connectivity is limited.
With a FLIR One Pro (Android) or a FLIR Edge Pro thermal camera, you can capture, analyze, and document thermal images.
All data and images are stored in organized projects, enabling clear documentation, structured notes, and easy reporting.
Projects can be exported as ZIP files and opened on any computer using the included JCTM Project Viewer, directly in any browser.
Key features and benefits:
Typical applications:
Demo and Pro versions:
The Demo version includes all functions with the following limits:
Professional-grade thermal imaging, anywhere.
Whether you’re a technician, inspector, or enthusiast, JC Thermal Master provides advanced analysis, precise temperature data, and professional documentation tools.
Keep your projects organized, and take full control of your thermal imaging workflow.
Legal notice:
The application communicates with FLIR One and FLIR Edge cameras using official FLIR SDKs.
These SDKs operate entirely on-device and do not transmit images or metadata to FLIR or third parties.
JC Thermal Master does not include advertising, analytics, or cloud-based data collection.
All data stays locally on the device or within the exported project ZIP.
FLIR and FLIR One Pro and FLIR Edge Pro are trademarks of Teledyne FLIR, LLC.
JCTM is a Teledyne FLIR-approved application.
Privacy Policy for JC Thermal Master:

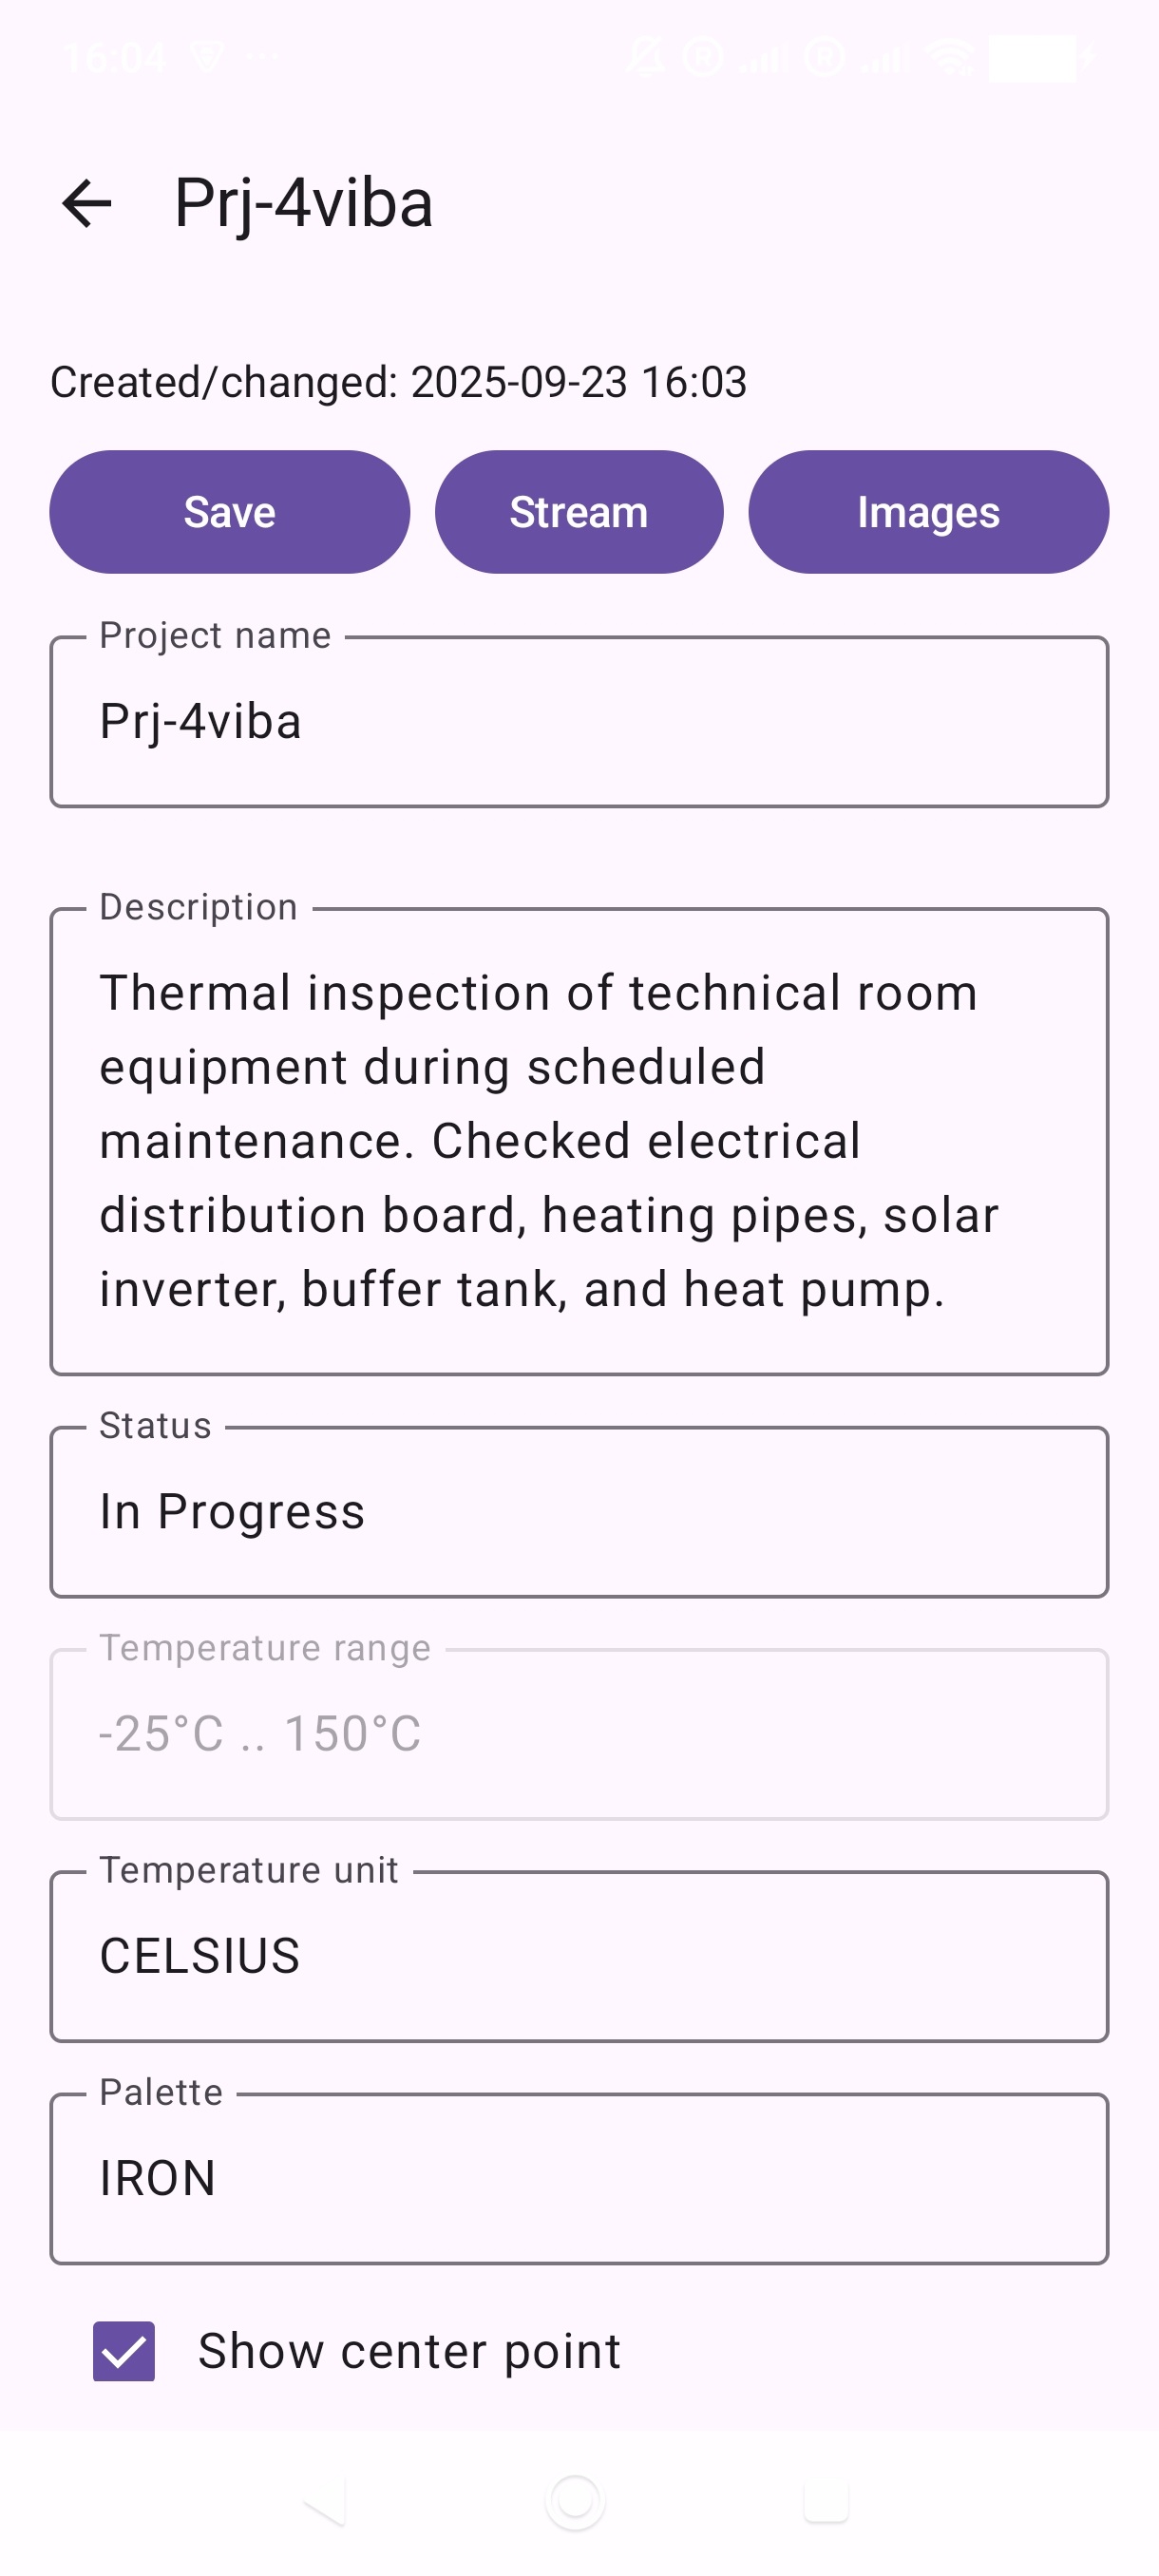
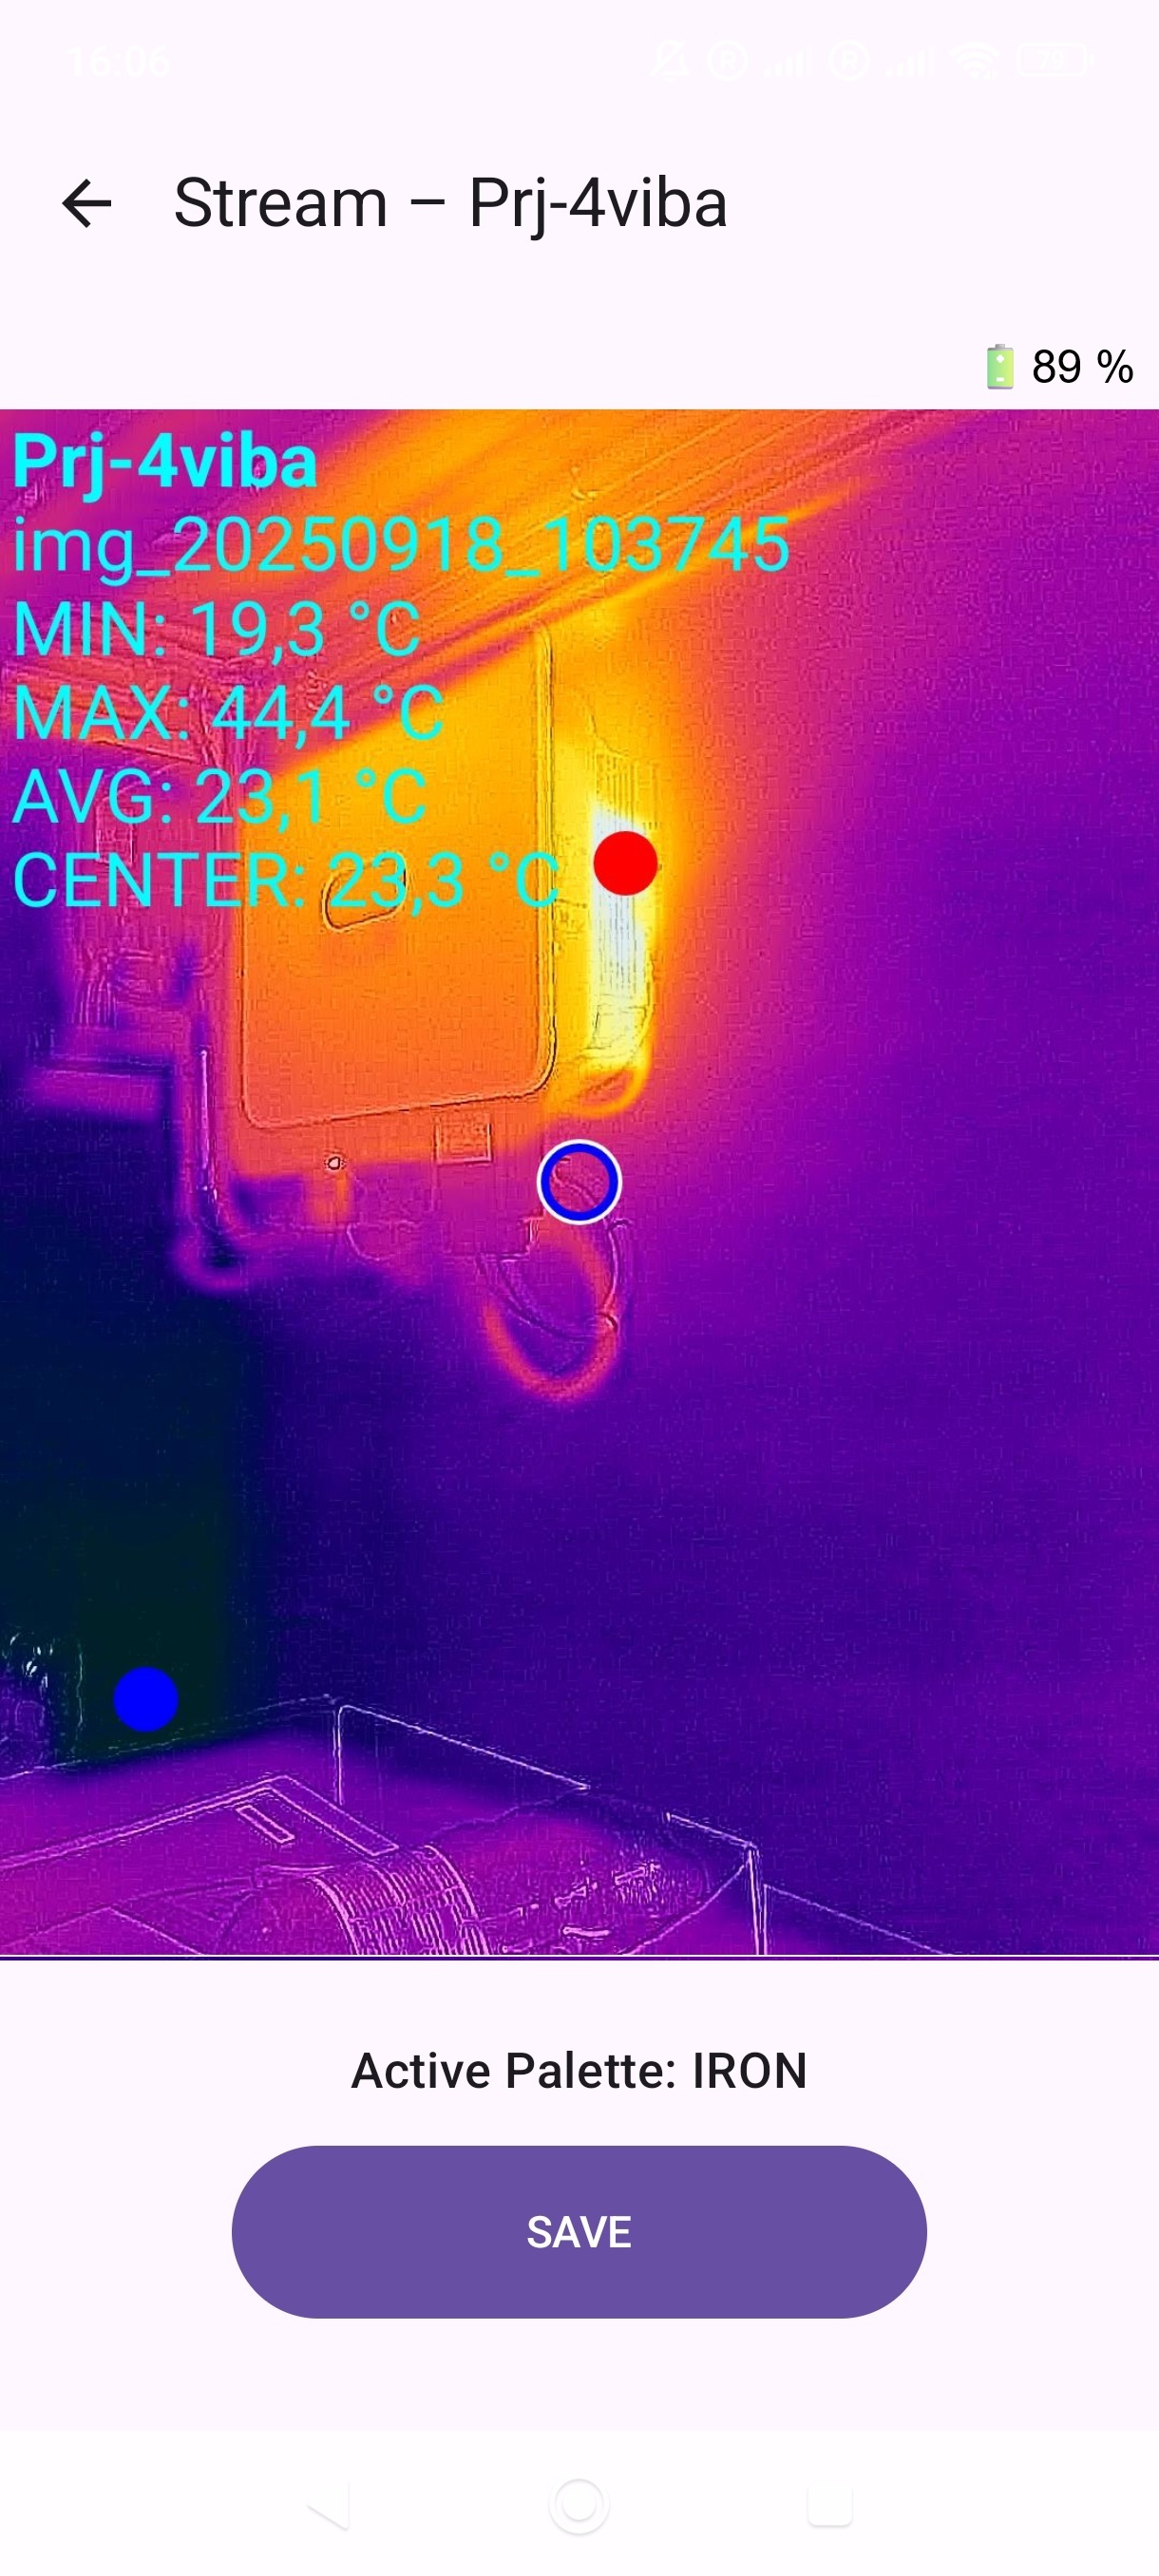
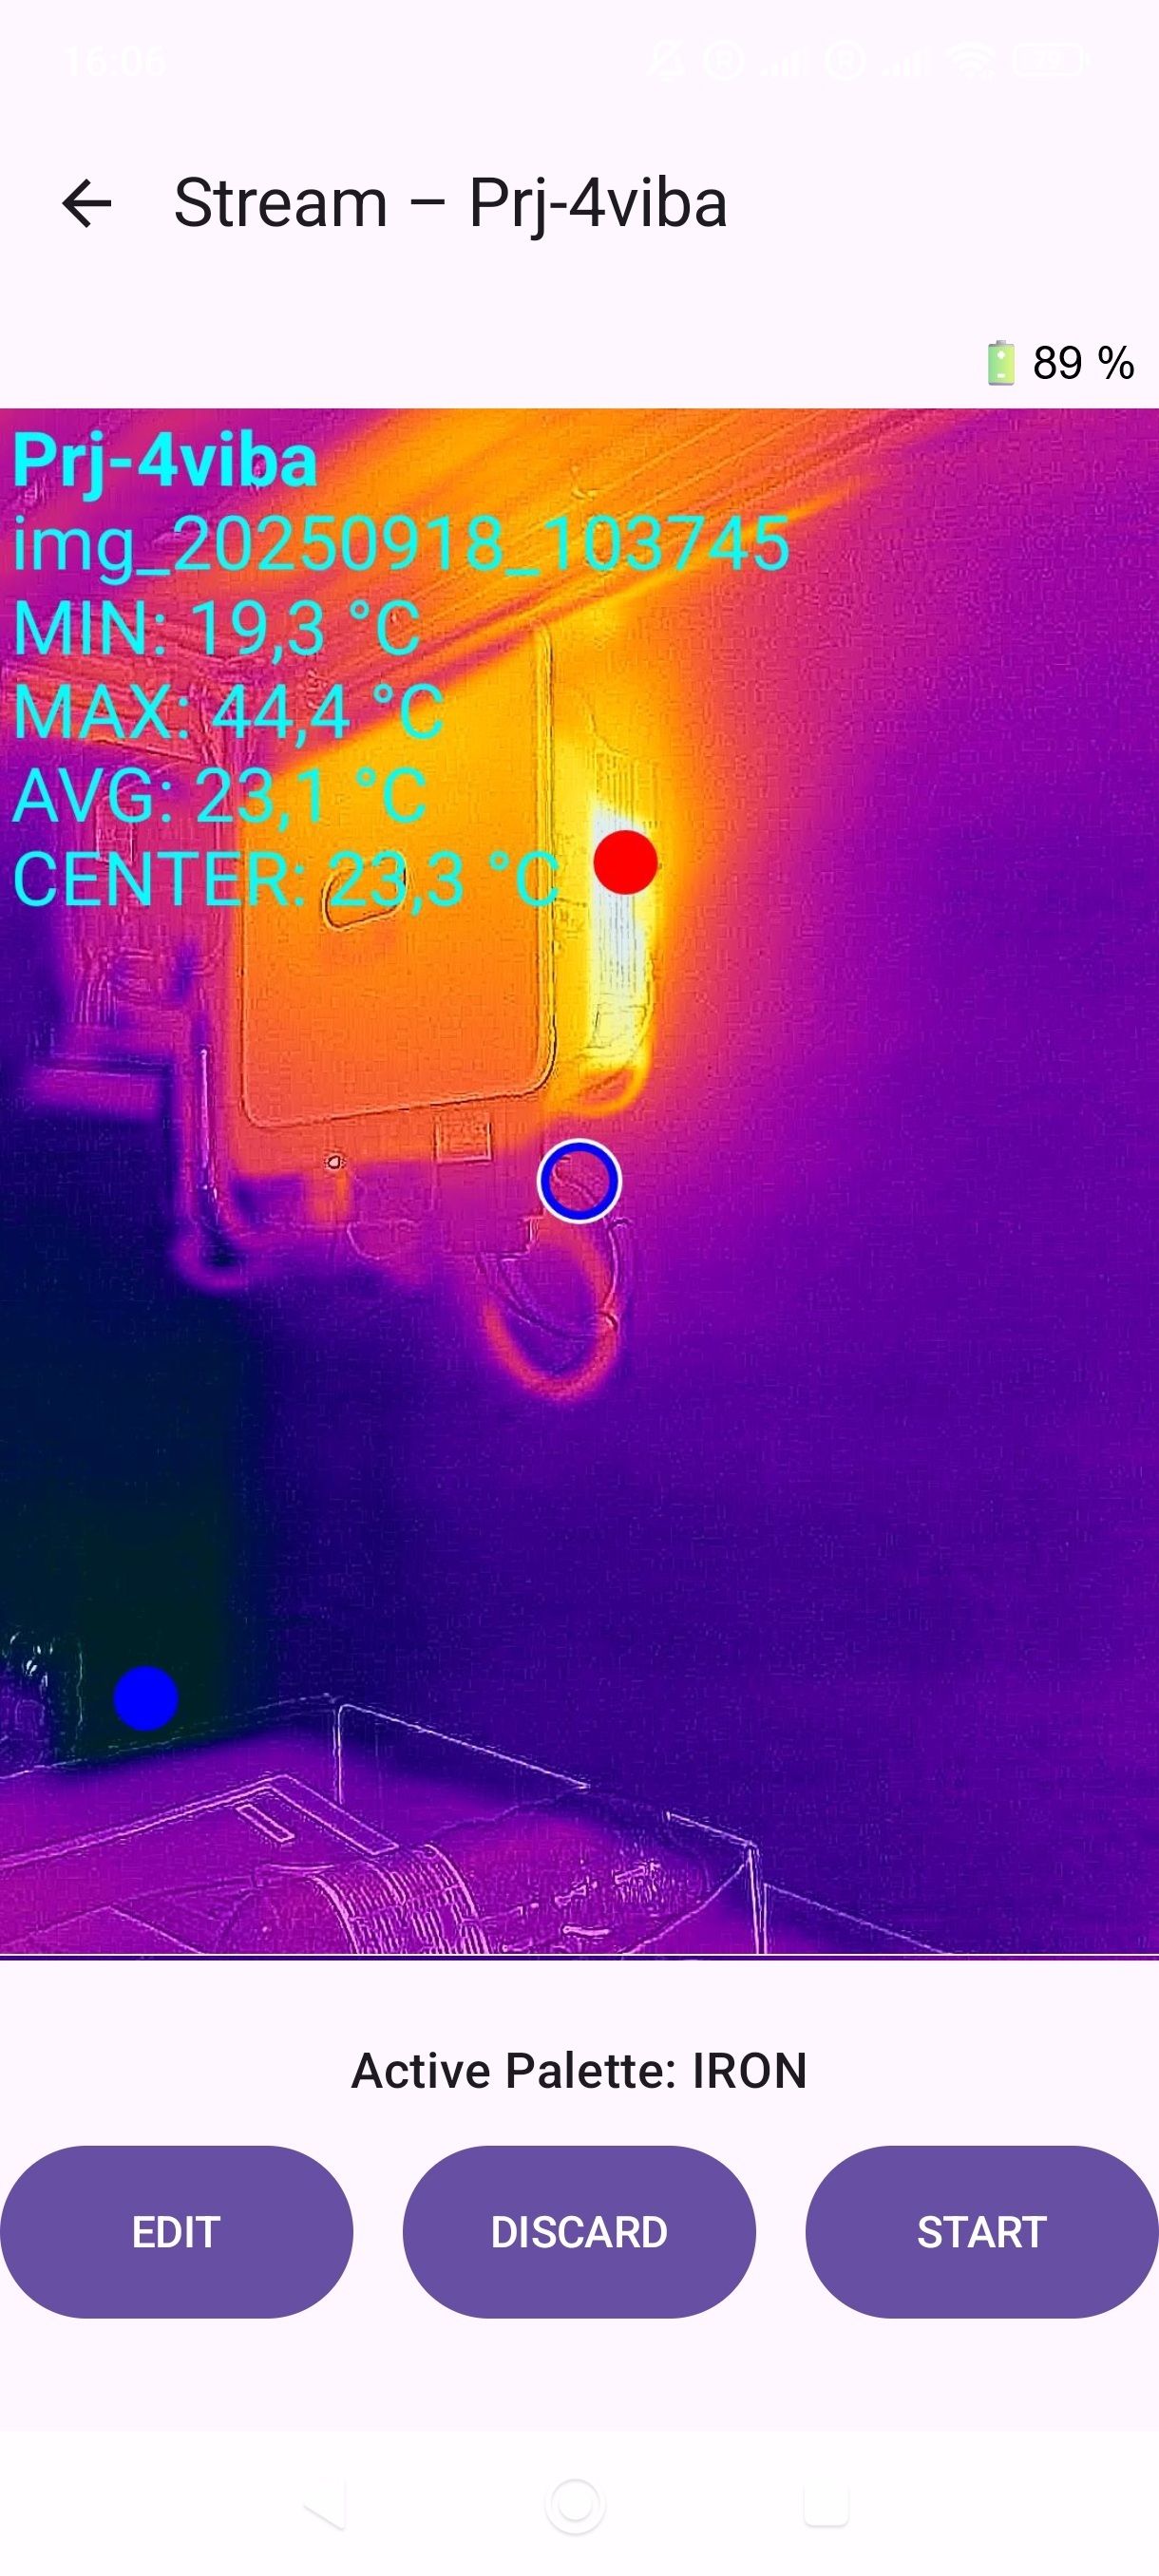
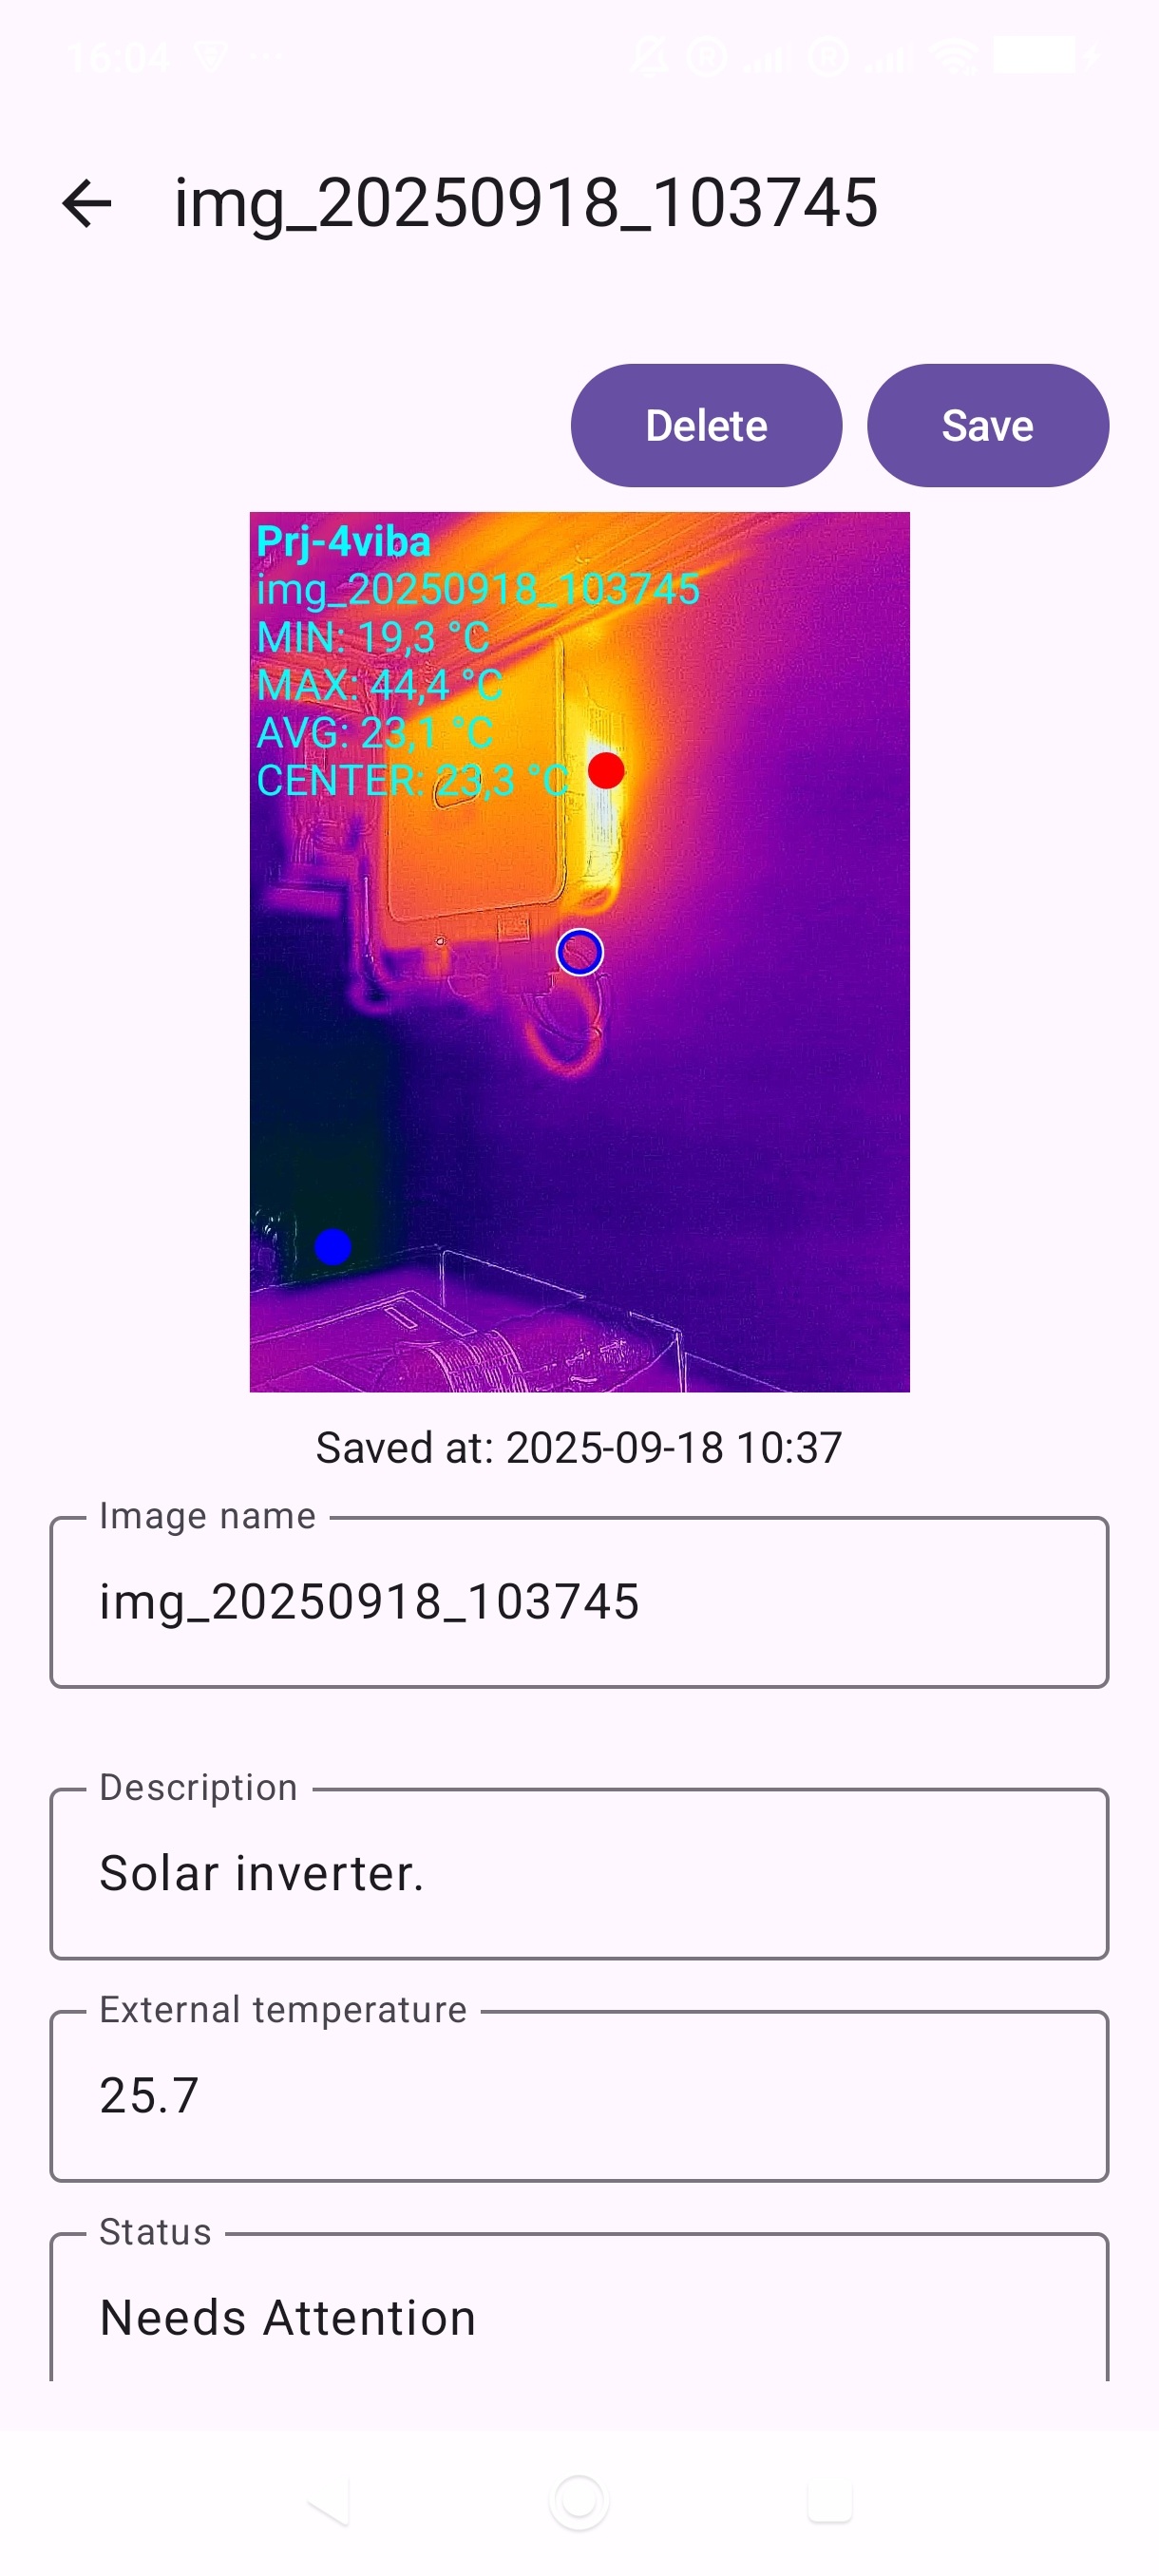
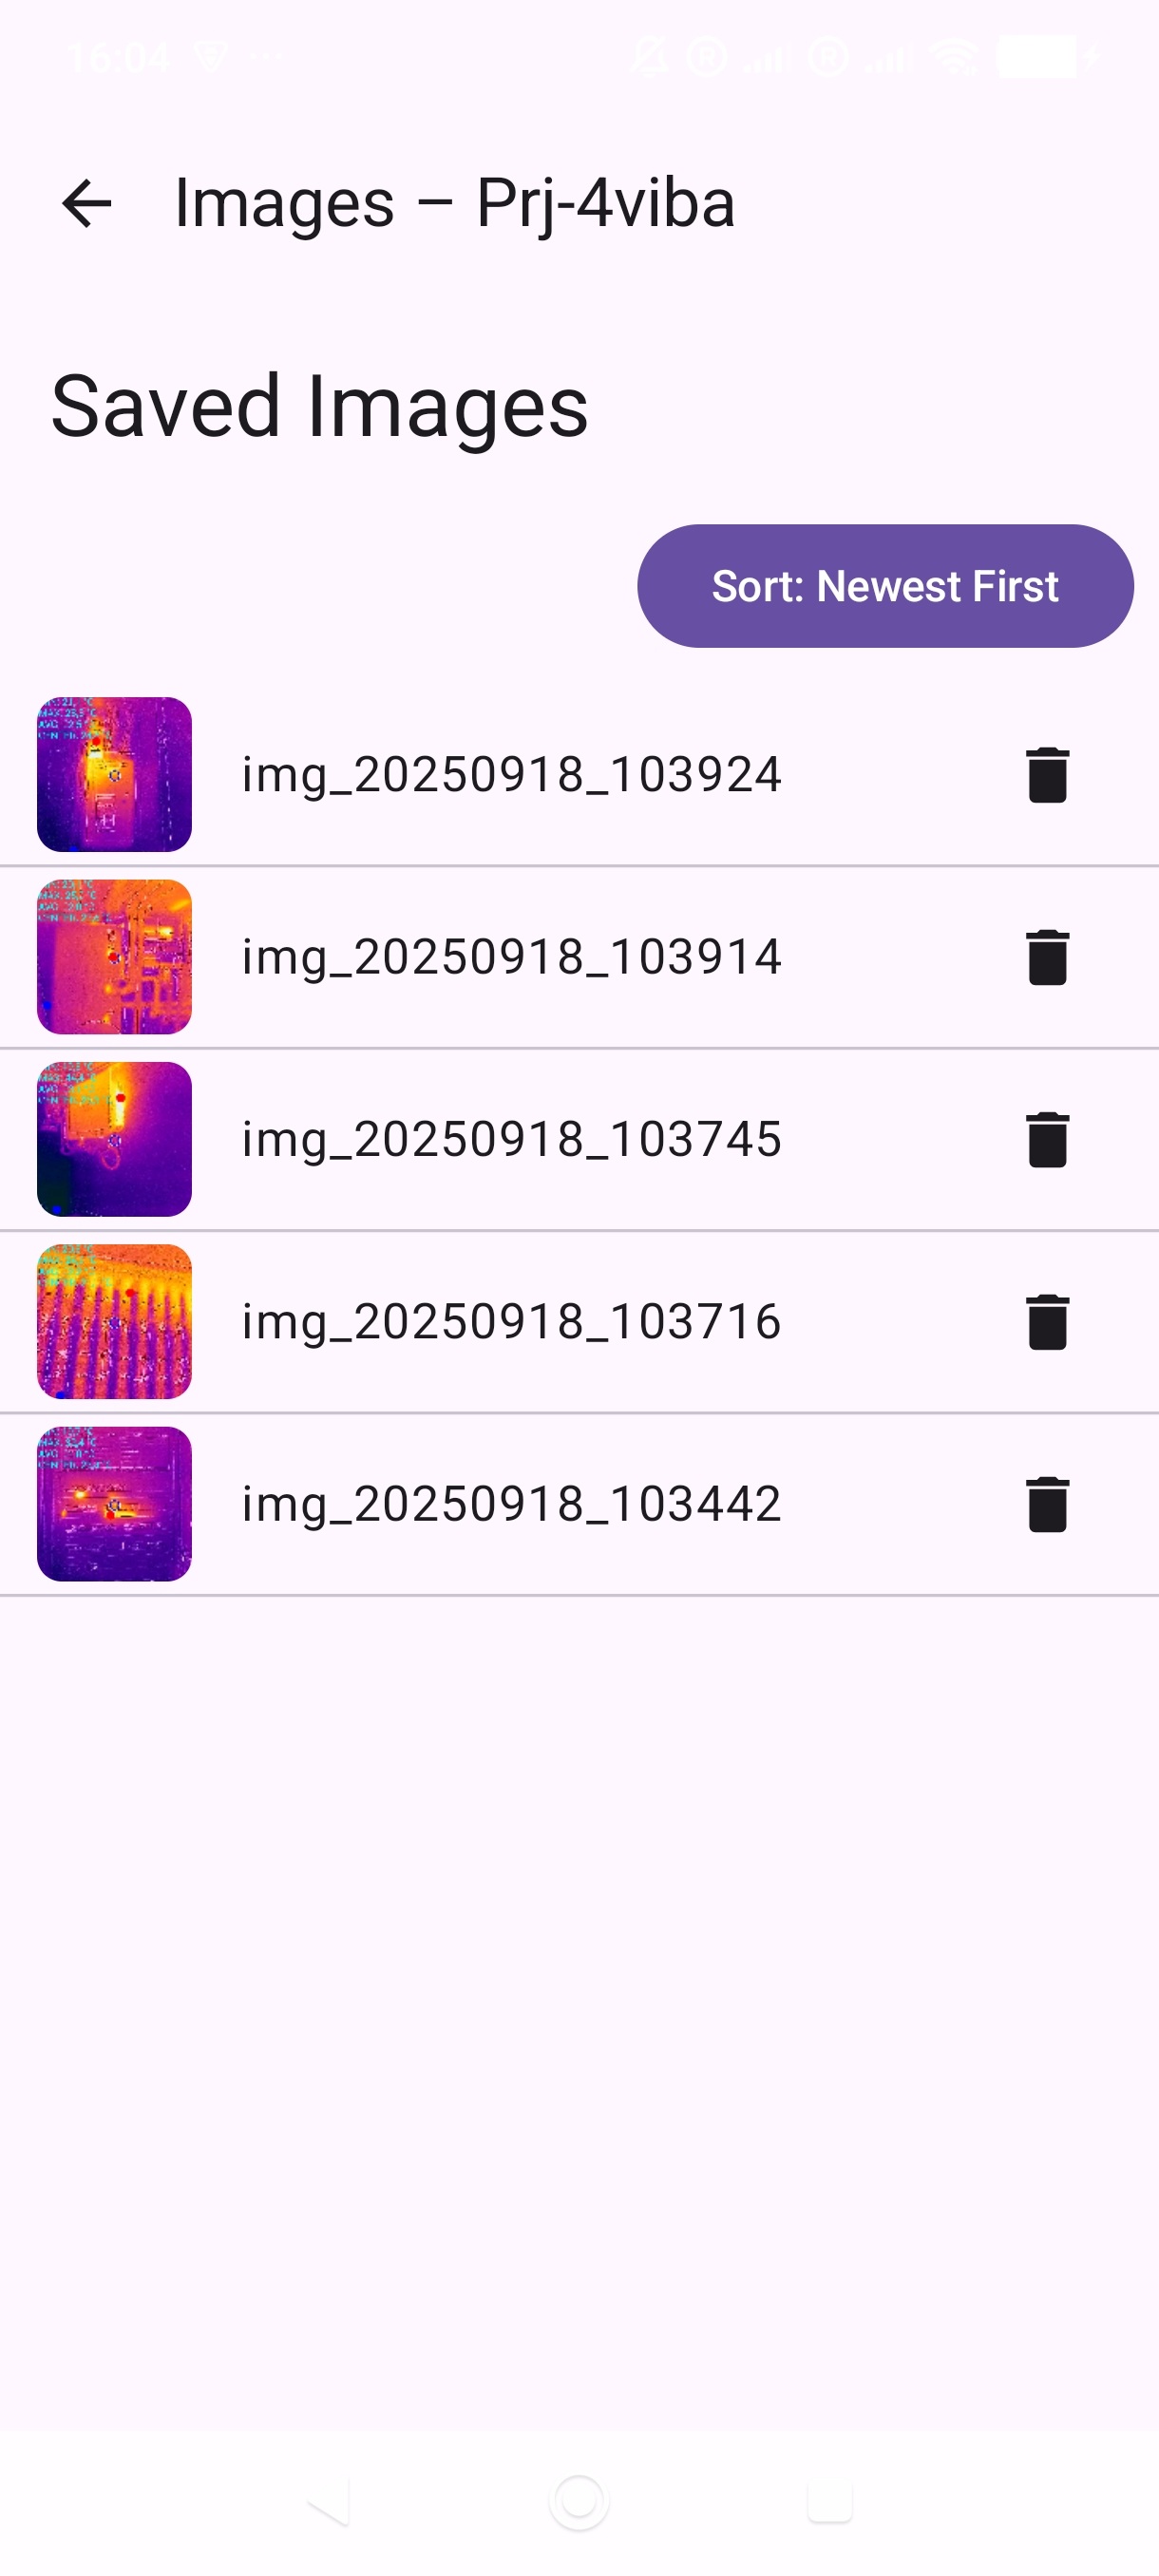
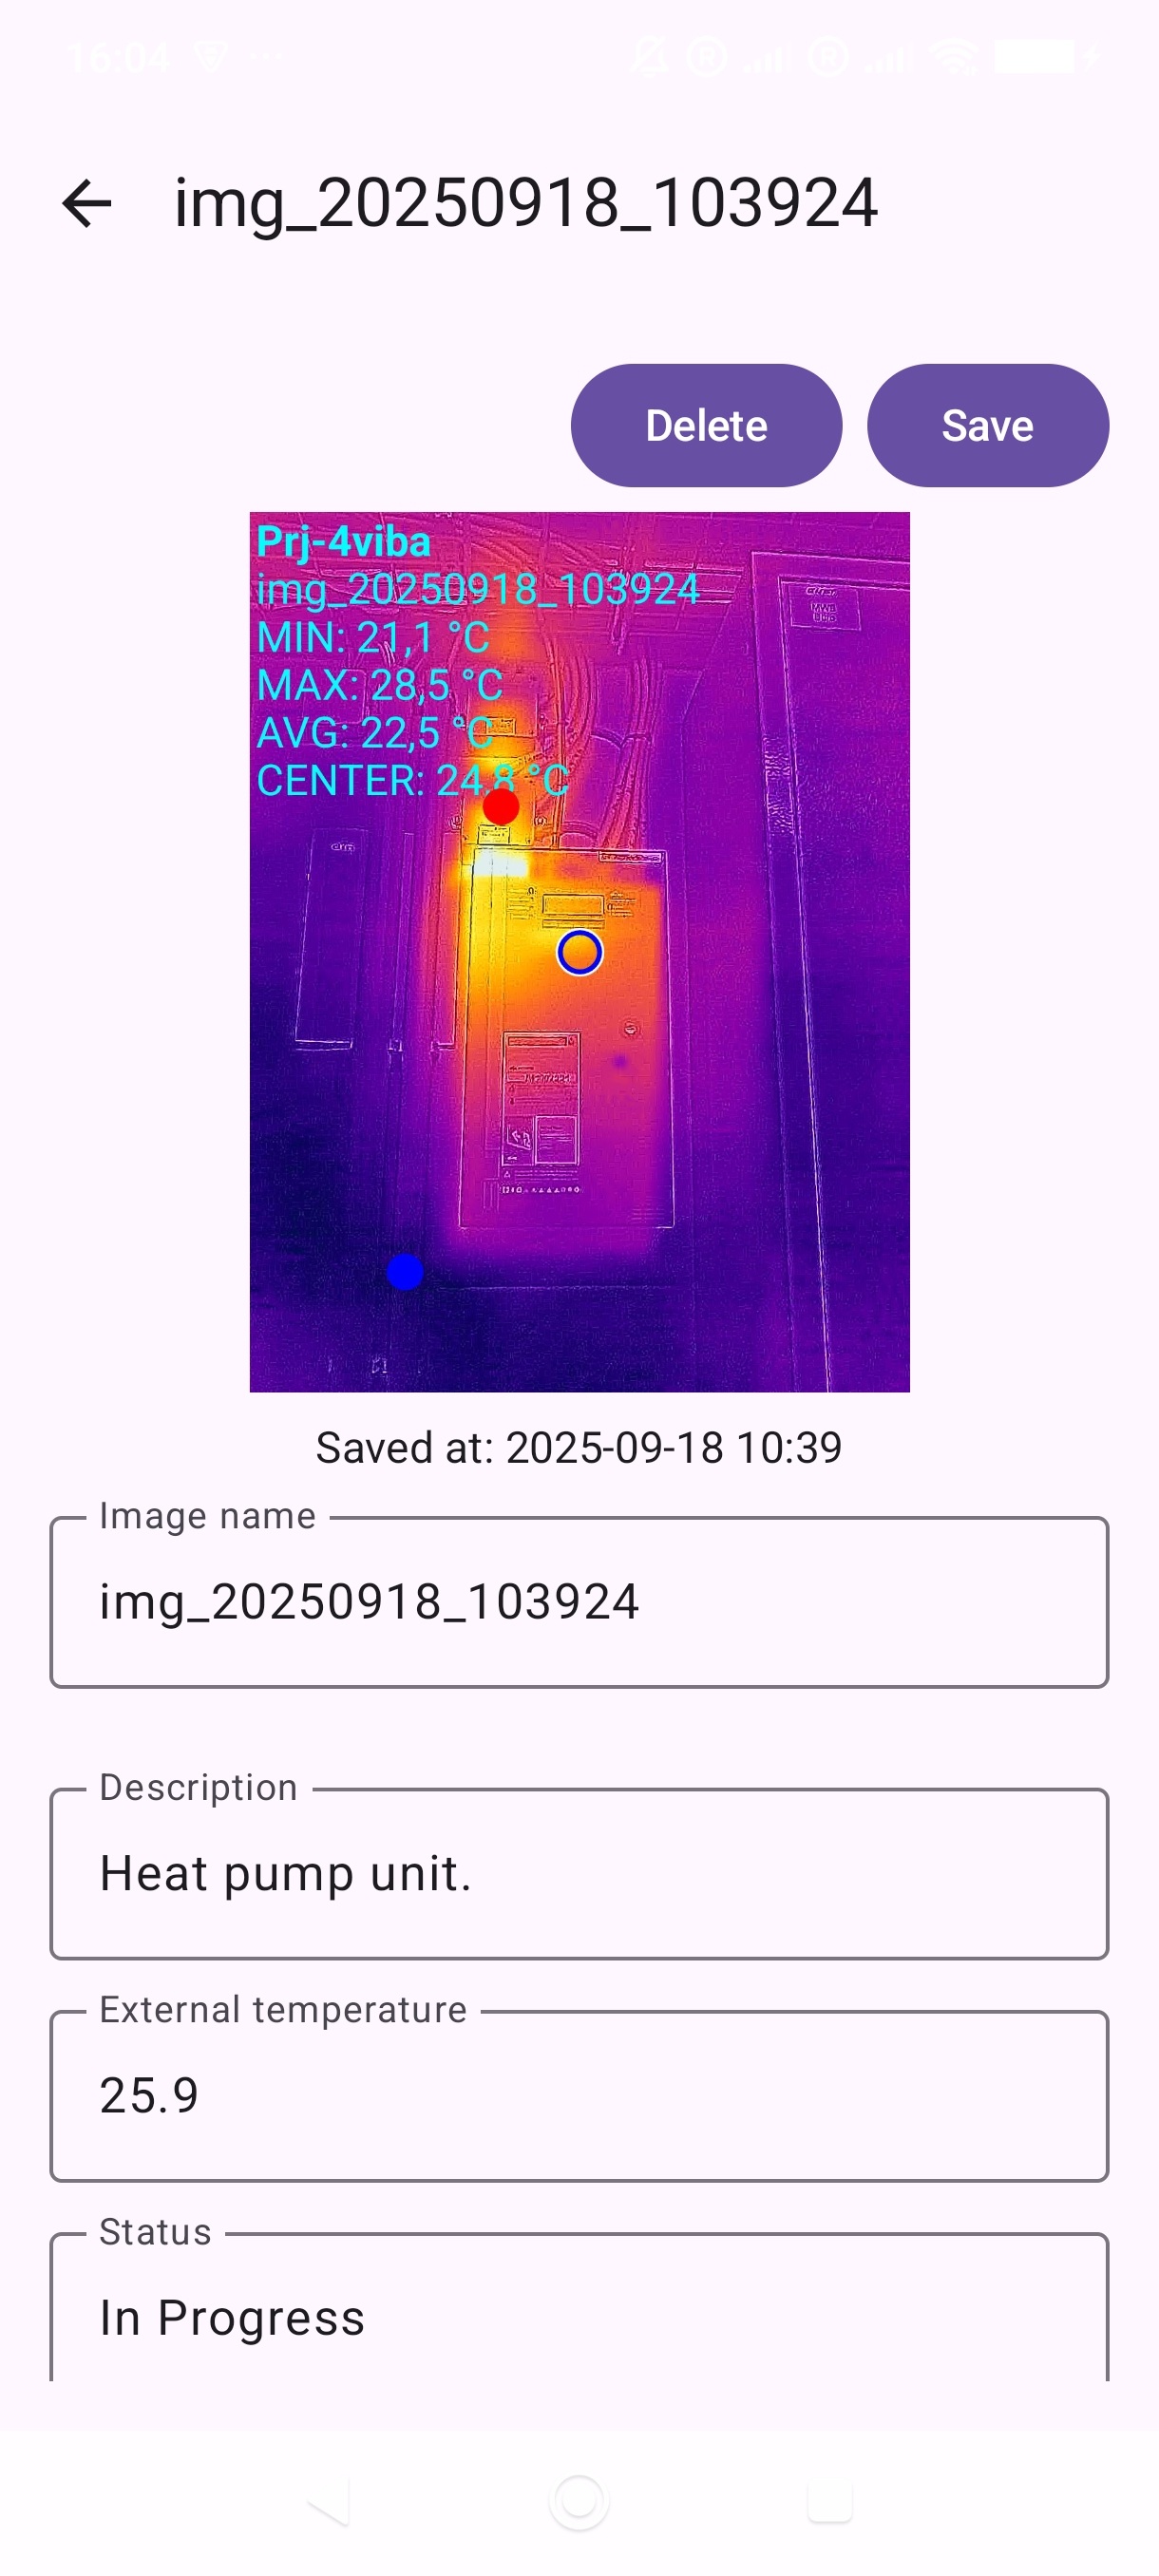
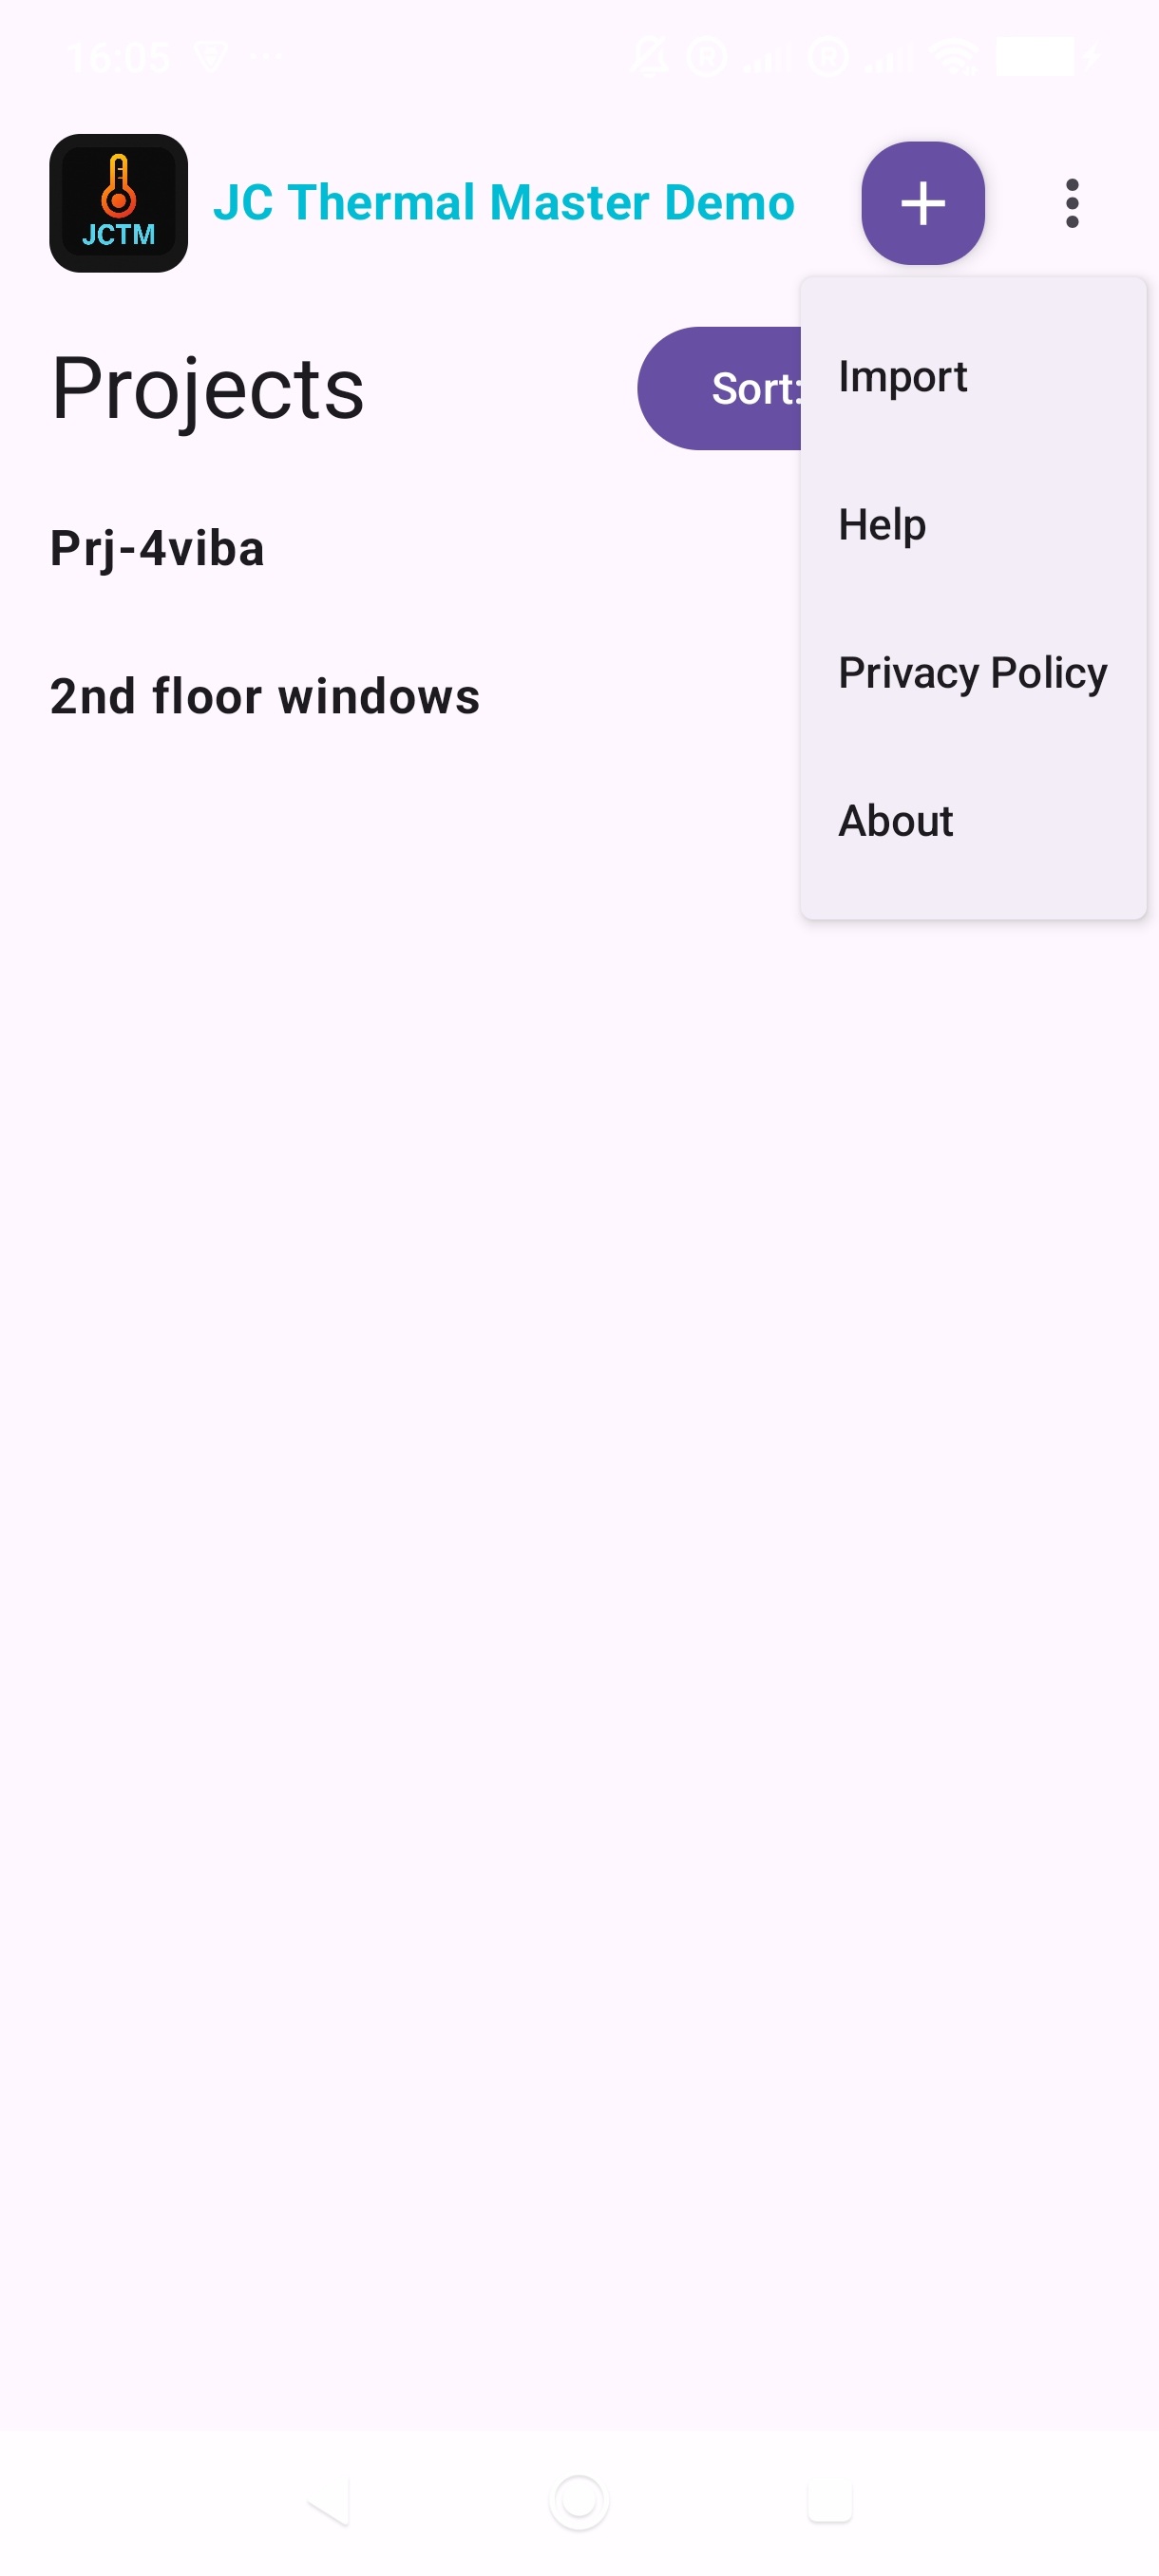
Table of Contents
JC Thermal Master is an advanced, offline-capable application for the FLIR ONE Pro Android thermal camera. The FLIR ONE Pro is a professional thermal camera module that connects to a smartphone via USB-C and can capture thermal images with fine detail. It has its own battery providing approximately 60 minutes of operation and can be charged via another USB-C port dedicated to charging. It can also be used with an external power source (a 5-volt power bank). With a FLIR ONE Pro thermal camera connected to an Android device, the app displays a real-time infrared image on the mobile device with temperature values.
Note: The JC Thermal Master app is supported only on devices running Android 13 or higher. Older Android versions are not compatible.
The JC Thermal Master app offers project-based image and data management, detailed note-taking, and professional export options—an ideal choice for anyone who wants thermal work to be documented, searchable, and shareable.
This manual walks you through the available features.
All thermal images and data are saved in organized projects, making findings easy to review and share after an inspection. You can also display stored and downloaded (or received) projects on any PC or laptop (Windows/Linux/Mac) using any browser with the included viewer application. In other words, with JCTM Project Viewer anyone can view (and print) the images and content of an exported project; no other application is required. The JCTM Project Viewer program is available free of charge even with the Demo version.
JC Thermal Master is designed for professionals and anyone who needs to capture, analyze, and document thermal images in the field (offline).
Who might find it a useful work tool? Here are just a few examples (the application possibilities are virtually endless):
Note: JC Thermal Master is under active development; features are continuously evolving and new capabilities are added based on user feedback.
In the Demo version all features work the same as in the Pro version, with only three limitations:
On the start screen you can review all projects you have created.
Tap the + (Create) button at the top, give it a name or leave the default name unchanged, then start creation by choosing Create. The new project appears in the list (e.g., “Prj-1”). Note: In the JC Thermal Master Demo version, at most two projects can appear on the list at the same time. The Pro version has no such restriction.
Use the Sort: A–Z / Newest First toggle to switch between alphabetical and date sorting. With date sorting, the most recently created or modified project is always at the top.
In the Projects list, tap the Trash (🗑️) icon next to the project name, then confirm by choosing Delete. Deletion is permanent.
On the Projects screen, tap the Floppy disk (💾) icon next to the project name, then confirm the export by choosing Save. The project is saved to the mobile device as a .zip file in the /Download/JCTM/export/ folder.
This function exports complete projects—including images and metadata—into a single ZIP file for backup, sharing, or reporting.
Export files (.zip) receive different names even if you start exports multiple times with the same project name, because the stored file name consists of the project name displayed in the list and the current timestamp. In other words, if you export a project repeatedly (Floppy disk icon, 💾), a separate .zip file is created each time, with a different name (the project name portion does not change, only the timestamp).
Tap the project name to display the project details. Here you can rename it, modify the description, and adjust settings (palette, unit, etc.). After selecting a project from the project list, the following data/fields appear:
At the top: the selected project’s name, the Created/changed time, and three buttons: Save, Stream, Images.
Additional project data and settings:
If the project’s status is set to “Archived,” neither the project data nor the data for stored images can be edited. To make changes, first change the project’s status to a different value. When a project is set to Archived, the Stream feature cannot be started. In the Images menu, images are view-only: you cannot delete them or modify their data as long as the project remains Archived. To make changes, first change the project’s status to a non-Archived value.
The palette determines which colors are used to display temperature differences, making thermal patterns easier to recognize.
Available palettes:
Tip: It is best to adjust settings before streaming/capturing. The selection will affect the live view and new captures within the project. Choose what suits the task best. Of course, the content and colors of already captured images will not change. You can modify the setting at any time and as often as you like.
Changes are recorded only when Save is pressed. If any field has been modified, and you tap the Back arrow or the Stream or Images button, the app displays a message: “Unsaved changes.” You can then choose Discard or Save to decide what to do with the modifications.
Default measurement parameters applied at streaming start; adjustable on the Radiometry panel and savable back to project defaults.
Note:The thermal model temperature values are independent of the project’s temperature unit settings and are always considered in Celsius.
If the connection is unsuccessful, the following text appears:
No camera found! Please connect your FLIR ONE camera. Then press the power button on the camera and wait until the LED starts blinking green. After that, go back and restart the stream.
Follow the instructions to connect successfully.
When you connect a FLIR ONE camera to an Android device, it may happen (if another application that also uses the FLIR ONE camera is installed) that the other app requests permission to use the camera. If you intend to work with JC Thermal Master, you must deny that request (“Cancel”). When you start the Stream function, a similar permission dialog will appear again, but this time it will refer to the JC Thermal Master (Demo or Pro) application. Choose “OK”.
The selected project and the active palette name; optionally a circular reticle in the image; the hottest/coldest point markers (red/blue dots) if enabled in project settings; and continuously updated MIN / MAX / AVG values (and Meas P. if enabled).
During streaming, the current charge level of the FLIR ONE camera’s battery is shown above the top-right corner of the image (e.g., 100%). A small lightning icon indicates when the battery is charging. The camera draws power from its own battery, not from the phone. The built-in battery provides approximately 50–60 minutes of operation. An external power source (e.g., a power bank) can be connected to the USB-C port on the bottom of the camera to significantly extend the operating time.
Occasionally, the text “Calibrating…” appears above the top-left corner of the image. This indicates that the thermal camera is performing a calibration. It lasts about 1–2 seconds and triggers automatically. During calibration, the live stream pauses. Calibration ensures accurate temperature measurements under changing conditions (e.g., sensor warming, variations in the thermal environment.)
Point the device in the correct direction and aim it at the object to be examined. Use the live view to find the position where the required information is clearly visible. When the image and focus are satisfactory, press the SAVE button to capture the frame.
At the moment of saving, the stream (live view) freezes. The image is saved in the project with a timestamped file name (for example: img_20250805_153210). The following metadata is also saved:
The previously saved image remains stored in the database with default (partly empty) data, and its description or other fields can later be edited in the Images menu.
EDIT Mode After pressing the EDIT button, the metadata fields appear below the image:To save coordinates, the JC Thermal Master application must have location access permission while in use. Precise location (high accuracy) must also be enabled. If both are granted, the GPS coordinates are stored when pressing SAVE — these values cannot be modified later.
Some fields are freely editable (optional), while others are non-editable and shown in gray.
Once you return from edit mode, you can again choose:
On the project details screen (which appears after selecting a project and shows the selected project name at the top), tap the Images button to open the image list. Items display the image name.
Default sorting: newest (most recently modified) at the top. You can choose a sorting mode using "Sort: Newest First" or "Sort: A–Z". Tapping any row displays the saved image along with its current data.
Image name: The default name (default: “img_date_time”) can be edited here to provide a more descriptive identifier (e.g., “Main Hall – Switch Cabinet”).
Description: Can contain multi-line notes. You can enter even several thousand characters; the practical limit is the device memory. The fastest and most convenient way is to use a Bluetooth keyboard on the mobile device; this can significantly speed up your work. A Bluetooth mouse could be used but is not really necessary thanks to the touch screen.
Temperature values:Measured temperature values. The application stores the measured minimum, maximum and average temperature values of the current image. If the measurement point is enabled in the project, the measurement point's value also shown in this page. These values are of course not editable.
External temperature: Optional numeric field for an externally measured ambient temperature. Decimal fractions can be entered using a dot; commas are not accepted. The “MIN” temperature visible on the thermal image often equals ambient temperature, but not always. If needed, you can record the air temperature here—measure it by pointing the thermal camera at an object/wall that has been exposed to ambient air for a longer time and is not being heated or cooled by any device nearby. Then, for example, you can measure a refrigerator’s internal temperature, save the image with SAVE, and after pressing EDIT enter the previously measured air temperature into the “External temperature” field. The current unit is not shown here, but it is logically interpreted to match the unit used for the values displayed on the image.
Location: If GPS was enabled and a location could be obtained, it appears here (not editable).
Palette and dimensions: The used palette and the captured image dimensions are saved for each image. (not editable).
Thermal model: The application saves the thermal model settings of the project (the current values when the image was captured) and store them as metadata (not editable).
Time stamps: The capture and the last modification date and time are stored down to seconds. (read-only).
Status: Select the current status for the image from the following:
Tags (keywords): You can easily add custom tags to the image. We suggest to use commas (,) to separate your tags.
Favorite: Mark the current image as favorite.
After editing, tap the Save button in the top-right corner. If any field has been modified, and you tap the Back arrow, the app displays a message: “Unsaved changes.” You can then choose Discard or Save to decide what to do with the modifications. To delete an image, tap the 🗑️ icon in the list and confirm (this is permanent).
Note: Accuracy depends on the device and the environment. Coordinates are saved automatically and are not editable.
After tapping the menu icon (⋮) in the top-right corner, the following menu items appear:
Load previously saved (exported) projects. On the Projects screen, open the Vertical Ellipsis (⋮) icon and select Import, then locate the JC Thermal Master project ZIP file to be loaded in the /Download/JCTM/exports/ directory. The app will import the complete project, allowing you to view, edit, extend previously stored data, or record new images into the project. Note that a project with the same name cannot be imported more than once; the app will not overwrite an existing in-memory project with the same name and will show an error instead.
If a project (e.g., “Prj-1”) has been exported multiple times with different timestamps but the same project name, you can only import them one by one if there is no project with that same name listed in memory (project list). In other words, if the same project has been exported multiple times with different timestamps, you will only be able to import them individually after deleting the project with the same name from the list. If this would cause data loss, export (save) the project before deleting it. You may repeat this process with the same name as many times as you like, but you cannot import a project whose name (without the timestamp) matches a project name currently shown in the list.
The external JCTM Project Viewer (JCTM Project Viewer) allows exported ZIPs to be opened in any modern browser, even offline.
After exporting a project from JCTM you are going to find the exported files in the "/Download/JCTM/" folder on your phone. In this folder two separate exported data can be found:
The included JCTM Project Viewer provides an offline, browser-based interface for viewing and editing exported JCTM project ZIP files.
After opening a project ZIP, all project details and image data appear in an editable form layout. The following fields can be changed if the project is not archived:
All other metadata (timestamps, temperatures, GPS, palette, etc.) are read-only. Changes remain local until you click Save project, which creates a new ZIP file including your edits. You can also use Download Image, Download Data, or Print for individual images. Recent projects are remembered locally for quick reopening, even offline.
While streaming, tap Radiometry in the top overlay to open a compact control panel.
The panel shows the current measure point temperature (“Meas Point”) and a live ΔT value relative to a Reference temp (default 22.0 °C; editable).
You can adjust these parameters in this order:
Note:The thermal model temperature values are independent of the project’s temperature unit settings and are always considered in Celsius.
Changes are sent to the camera automatically after a short delay. Use Reset to project to restore the project defaults, or Save defaults to store the current values as the new project defaults.
To trigger a manual calibration (NUC), tap Calibration. The “Calibrating…” label appears during the process; the stream resumes after 1–2 seconds. Auto calibration may also occur periodically.
This app is under active development and new features are continuously evolving. We are planning to introduce new functions in the future, such as:
You can send questions or comments anytime to our email address: jctm@jc-technology.at
You can find new information related to the JCTM app on our website: www.jc-technology.at/jctm
JC Thermal Master – User Manual. This document is for version
1.3. Content is subject to change as the app develops. © 2025 JC-Technology GmbH.
FLIR and FLIR One Pro and FLIR Edge pro are trademarks of Teledyne FLIR, LLC.
JCTM is a Teledyne FLIR-approved application.